
Lower Wall Dampness & Peeling Paint Causes: How to Distinguish Plumbing Leaks from Rising Damp
Paint blistering or white crystalline salt deposits 15 to 60 cm above floor skirting boards are never a cosmetic issue solved by repainting—they are physical indicators of active moisture migration that must be traced at the source.
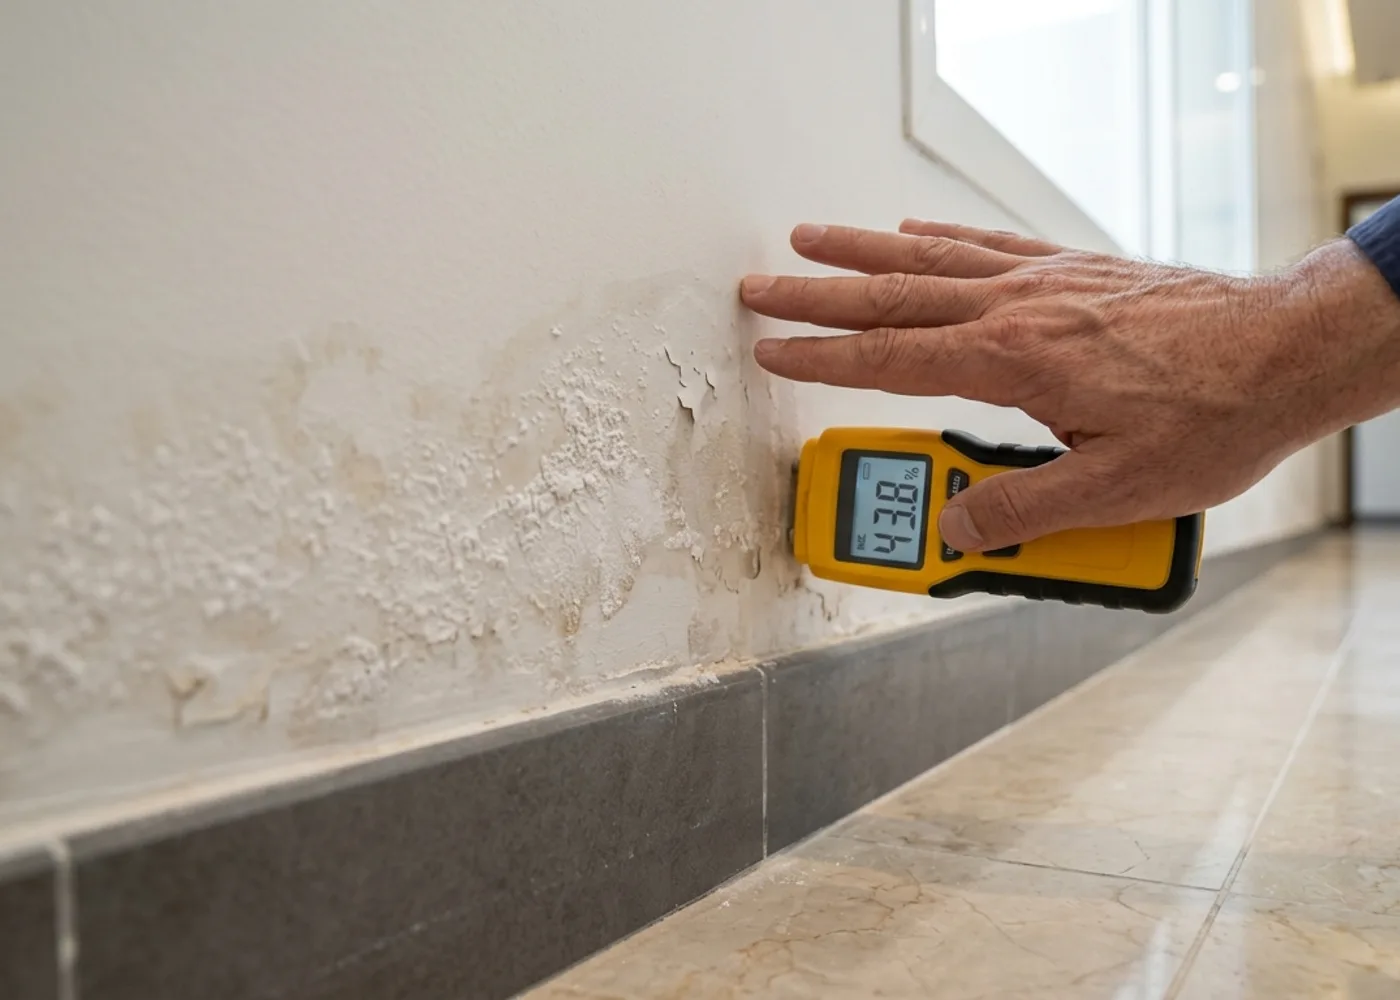
Mandatory Diagnostic Principle: It is technically impossible to confirm the exact cause of wall dampness from visual paint peeling or photographs alone. Surface blistering looks similar whether caused by an internal pipe leak, failed adjacent wet-area waterproofing, underground tank seepage, or capillary rising damp. Definitive diagnosis requires on-site moisture gradient mapping, thermal imaging, and pressure isolation testing.
Executive Engineering Summary
Many villa and apartment owners in Jeddah and Makkah experience recurring paint peeling and腻子 (putty) flaking along lower walls just weeks after repainting or covering the wall with PVC marble panels. Such cosmetic fixes fail because cementitious render and concrete masonry units (CMU) act like porous capillary sponges drawing water from a concealed source; as water evaporates into air-conditioned rooms, dissolved sulfates and chlorides crystallize beneath the paint film and push it off the substrate.
Crucially, the visual appearance of lower-wall dampness looks nearly identical across four completely different engineering scenarios: a pinhole leak in a pressurized in-wall supply pipe, lateral water migration from beneath an adjacent bathroom tile bed, seepage from an underground tank or courtyard pipe, or capillary rising damp from saline coastal soil across ground beams. This guide explains how engineers isolate the true cause without guesswork.
Engineering Schematic: The 4 Plausible Sources of Lower-Wall Dampness
How physical diagnostics separate identical-looking lower-wall dampness symptoms
Adjacent Wet-Area Sub-Tile Seepage
Eroded grout/drain collar + missing cove or threshold waterstop
Pressurized In-Wall Supply Pipe
Weeping PPR elbow or mixer adapter trailing down the wall chase
Underground Tank or Courtyard Line
Saturated courtyard fill migrating under ground beams
Capillary Rising Damp (Sabkha)
Saline groundwater climbing capillary pores 40–80 cm high
Illustrative engineering diagram only — final technical diagnosis and remediation scope are determined following on-site property inspection.
Plausible Engineering Causes & How We Verify Each On-Site
Cause 1: Lateral Seepage from an Adjacent Bathroom or Kitchen Sub-Tile Bed
#1Engineering Mechanism: When bathroom tile grout erodes or sealant around floor drains and toilets fails, wash water accumulates inside the sand screed bed beneath the ceramic tiles. If the waterproofing membrane turn-up (cove) or door-threshold waterstop is missing or damaged, the lower masonry block course absorbs this trapped water, manifesting as dampness and peeling paint on the dry hallway or bedroom side.
Key Indicators & Clues: Dampness concentrates along the shared bathroom partition wall or around the bathroom door frame at a height of 15–40 cm, worsening with heavy daily shower usage.
Verification Method: Non-destructive dielectric moisture mapping across the wall and bathroom floor combined with infrared thermography around floor drains and grout lines.
Cause 2: Pinhole Leak in a Pressurized In-Wall Supply Pipe
#2Engineering Mechanism: Heat-fused PPR pipe joints or brass female thread adapters behind shower mixers, washbasins, and water heaters can develop hairline cracks due to booster pump pressure spikes or hot-water thermal expansion. Water weeps silently inside the wall chase and gravitates downward to pool above the floor skirting.
Key Indicators & Clues: A localized damp patch that may originate near mixer height (60–110 cm) and trail downward, remaining wet even when the bathroom floor has not been washed for days.
Verification Method: Hydrostatic or nitrogen pressure drop testing on hot and cold supply manifolds, paired with acoustic listening and thermal camera pipe tracing.
Cause 3: Seepage from an Underground Water Tank or Exterior Courtyard Pipe
#3Engineering Mechanism: When an underground water tank neck, overflow line, float valve, or buried meter-to-tank pipe leaks, the soil beneath the courtyard tiles becomes saturated. This water migrates beneath the perimeter ground beam and rises into adjacent ground-floor interior and exterior walls.
Key Indicators & Clues: Dampness along perimeter ground-floor walls near the underground tank or water meter, often accompanied by slight courtyard tile settlement or an elevated water bill.
Verification Method: Structural underground tank inspection and pressure testing of buried courtyard lines using a ground geophone microphone.
Cause 4: Capillary Rising Damp from High Water Table or Uninsulated Foundations
#4Engineering Mechanism: Where saline groundwater (Sabkha) is shallow or irrigation/rainwater pools against inadequately waterproofed foundations, salt-laden moisture climbs through microscopic capillary pores in concrete and blockwork up to 50–90 cm above floor level until reaching evaporation equilibrium.
Key Indicators & Clues: A continuous, uniform horizontal band of dampness and crusty white salt crystals running along multiple ground-floor walls (never on upper floors), while water meter and plumbing pressure tests remain completely normal.
Verification Method: First ruling out active plumbing and tank leaks via pressure tests, then profiling vertical moisture-to-salt gradients along the ground beam to specify damp-proof chemical injection or negative-side cementitious waterproofing.
Wall Dampness in Jeddah: Coastal Sabkha vs. Internal Plumbing Leaks
In coastal and western Jeddah districts such as North and South Obhur, Al Shati, Al Murjan, Al Hamra, and Al Khalidiyah, the saline groundwater table often rises to within 1.2–2.0 meters of the courtyard grade. Where ground beams and foundations lack a continuous damp-proof course (DPC), saline moisture rises through capillary pores in ground-floor walls, producing dense white salt efflorescence.
Conversely, in districts like Al Safa, Al Salamah, Al Naeem, Al Nahdah, and Al Rawdah, lower-wall dampness in apartments and villas is predominantly driven by water-saturated sand beds beneath bathrooms and kitchens due to degraded tile grout, missing door-threshold waterstops, or weeping PPR pipe joints.
- North/South Obhur & Al Shati (Coastal rising damp + tanks)
- Al Basateen, Al Mohammadiyah & Al Murjan (Pools, courtyards & wet areas)
- Al Safa, Al Salamah & Al Zahra (Shared bathroom wall seepage)
Wall Dampness in Makkah: Booster Pump Pressure & Rocky Terrain Runoff
In Makkah (Al Awali, Al Shawqiyah, Batha Quraish, Al Aziziyah, Wali Al Ahd, and Al Sharai), coastal saline groundwater is rare, yet lower-wall dampness frequently arises from two primary mechanisms: first, high operating pressure generated by multi-story booster pumps stressing concealed wall pipe elbows and manifold fittings.
Second, water trapped above impermeable rock strata beneath courtyard tiles or around rock-cut underground tanks cannot percolate downward easily; instead, it migrates laterally into ground beams and ground-floor living room walls.
- Al Shawqiyah, Batha Quraish & Al Kakiyah (Bathroom & tank seepage)
- Al Awali & Al Naseem (High-pressure supply lines, pools & courtyards)
- Wali Al Ahd, Al Sharai & Al Rashidiyah (Backfill settlement & tank necks)
Safe Initial Homeowner Checks Before the Engineer Arrives
Practical, non-invasive steps to gather helpful observations safely
Map the Wall Location Against Adjacent Water Sources
Check what lies directly behind the affected wall: is it a bathroom or kitchen? Or is it an exterior wall facing the courtyard, swimming pool, or underground water tank? Does the issue occur only on the ground floor or on upper floors as well?
Visually Inspect Adjacent Bathroom Tile Grout & Door Threshold
If a bathroom backs onto the wall, inspect the floor tile grout joints, the perimeter around the floor drain trap, and the toilet base for eroded or hollow gaps that allow wash water to penetrate beneath the tiles.
Check the Digital Water Meter (30-Minute Zero-Use Test)
Turn off all faucets, toilet cisterns, and roof-tank fill valves for 30 minutes, then observe your NWC digital water meter or domestic booster pump: does the pump cycle on automatically every few minutes with no taps open?
Warning Signs Requiring Immediate Professional Inspection
- Moisture or salt crystals reaching lower-wall electrical outlets or sub-panels, or causing the earth-leakage circuit breaker (RCD/ELCB) to trip.
- Longitudinal cracking or hollow-sounding delamination of the cement plaster when lightly tapped, signaling potential corrosion of ground-beam or column reinforcement steel.
- Wall dampness accompanied by a persistent musty mold odor in bedrooms or loosening and tenting of floor skirting tiles.
- Continuous intermittent cycling of the domestic water booster pump throughout the day or an unexplained spike in the monthly water bill.
What Cannot Be Confirmed Without On-Site Instrumented Inspection?
- Determining whether moisture inside the wall originates from the hot supply line, cold supply line, drainage pipe, or adjacent wet-area tile bed.
- Pinpointing the exact centimeter coordinate of a concealed pipe defect behind tiles or plaster so repair opens only a single localized spot.
- Definitively distinguishing coastal capillary rising damp from a concealed underground tank or courtyard pipe leak.
- Measuring substrate moisture saturation depth to determine whether localized plumbing repair and drying suffice or negative-side salt-barrier waterproofing is required.
Engineering Physics: Why Repainting or Installing PVC Panels Fails to Solve Lower-Wall Dampness
When a homeowner notices peeling paint above the skirting board, an unspecialized painter often suggests scraping the surface, applying putty, and repainting—or covering the lower wall with decorative PVC marble sheets. From a building-physics perspective, this triggers a counterproductive phenomenon known as Capillary Rise Escalation.
Water trapped inside masonry blockwork and cement render continually seeks an evaporation path. Sealing the lower 60 cm of a wet wall with non-breathable oil paint or plastic wall panels without stopping the water source forces capillary moisture to climb higher above the panel line (rising from 40 cm to over 120 cm), while fostering toxic black mold growth behind the panels and causing internal salt crystallization (sub-florescence) that pulverizes the cement plaster.
- Never begin repainting or decorative cladding until pinless moisture meter readings drop to normal dry equilibrium (below 12%–15% depending on mortar type).
- Where plaster is salt-contaminated and friable, it must be stripped down to bare blockwork after fixing the leak, treated with a salt neutralizer, and re-rendered with a breathable cementitious waterproofing mortar.
Diagnosing and stopping the active moisture source once costs far less than repainting the same room three times or replacing mold-damaged wall cladding.
Bashaer Al Khair 4-Stage Diagnostic Protocol for Lower-Wall Dampness in Jeddah & Makkah
To guarantee zero unnecessary demolition of tiles or walls, our field engineers execute a structured four-stage diagnostic protocol that systematically isolates every plausible moisture source during a single visit:
Stage 1 establishes a vertical and horizontal Moisture Gradient Map at heights of 10 cm, 30 cm, 60 cm, and 100 cm using deep-sensing dielectric meters. Stage 2 uses high-resolution infrared thermography to detect evaporative cooling anomalies and hot-water line traces. Stage 3 isolates and pressure-tests supply lines while inspecting wet-area floor traps and grout. Stage 4 inspects the underground water tank and courtyard lines whenever ground-floor perimeter walls are involved.
Detailed Engineering Protocol for Lower Wall Dampness & Peeling Paint Causes: Field Workflow from Diagnosis to Root-Cause Resolution
When a property owner in Jeddah or Makkah contacts Bashaer Al Khair regarding lower wall dampness and peeling paint causes, our engineering team approaches the issue as an interconnected building-physics system rather than an isolated surface blemish. The diagnostic workflow begins by auditing the building’s operational profile: structural age, supply pipe material (heat-fused PPR, UPVC/CPVC, or legacy galvanized lines), existing waterproofing membrane history across roofs, tanks, and wet areas, domestic booster-pump pressure ratings, and the trailing six-month NWC meter consumption trend.
In the second stage of our field protocol, engineers execute Systematic Isolation and Elimination. Rather than stopping at the first visible damp spot or initial sensor reading, our team verifies all parallel pathways. In many residential buildings, eroded tile grout or aged roof flashing coexists with a weeping hot-water adapter or a maladjusted tank float valve; fixing only one while overlooking the secondary source guarantees recurring moisture damage within weeks.
In the third stage, quantitative instrument logs—deep dielectric moisture percentages, infrared thermal gradient captures, and manometer pressure-decay curves measured in bar—are translated into a clear, written remedial specification. This gives the property owner the least invasive, highest-reliability path forward, complete with exact material chemistries, required dry-film thicknesses, and post-execution verification testing.
- Comprehensive non-destructive baseline audit correlating meter flow, manifold pressure, and waterproofing integrity.
- Strict avoidance of cosmetic cover-ups (painting over damp plaster or surface patching without substrate prep) that compound structural damage.
- Adapting diagnostic thresholds and waterproofing chemistries to the distinct micro-climates of coastal Jeddah and mountainous Makkah.
Every technical recommendation we issue in Jeddah and Makkah is backed by verifiable on-site physical measurements to ensure first-time root-cause resolution.
Structural & Financial Consequences of Delayed Diagnosis in Jeddah & Makkah
Escaping water migrates silently through reinforced concrete elements, accelerating chemical and mechanical degradation every week it remains untreated. Once moisture carrying dissolved chlorides and sulfates penetrates the concrete cover of ceiling slabs, ground beams, or underground tank walls, it lowers concrete alkalinity and initiates reinforcement steel passivation breakdown. Corroding rebar expands up to six times its original volume, generating immense internal tensile stress that cracks and spalls the surrounding concrete.
Financially, intervening as soon as early symptoms of lower wall dampness and peeling paint causes appear typically restricts the scope to a non-destructive diagnostic check and a localized plumbing repair or straightforward membrane application. Allowing moisture migration to continue for months transforms a routine maintenance task into an expensive structural restoration involving rebar treatment, plaster replacement, re-tiling, and compounded utility bills.
- Protecting structural reinforcement steel in slabs, ground beams, and tanks against oxidation and concrete spalling.
- Preserving indoor air quality across bedrooms and living areas by eliminating hidden black mold and fungal spores.
- Stopping continuous financial drain from high-bracket NWC water bills and excessive summer HVAC electricity consumption.
Preventive Maintenance Checklist for Villa & Building Owners in Jeddah & Makkah
To safeguard your property’s plumbing and building envelope against sudden emergencies, Bashaer Al Khair engineers recommend a bi-annual preventive checkup—scheduled prior to the winter rainy season and ahead of peak summer heat—covering the following key checkpoints:
- Inspect the underground water tank, mechanical/electric float valves, and manhole neck every 6 months to prevent silent overflow or groundwater seepage.
- Monitor the instantaneous flow rate (L/hr) on your NWC digital water meter and dye-test toilet cisterns periodically to catch silent flapper leaks early.
- Clear roof rainwater drain strainers and inspect tile expansion joints, parapet skirting, and UV acrylic topcoats ahead of seasonal rainstorms.
- Inspect and renew tile grout and silicone seals around bathroom floor drains and shower enclosures to prevent sub-tile sand bed saturation.
Related Engineering & Diagnostic Guides
Water Leaking from the Bathroom Ceiling: How to Pinpoint the Exact Source Upstairs Without Random Demolition
When yellow stains or active water drops appear on your bathroom ceiling or gypsum soffit, the source lies in the wet area directly above—but is the culprit a pressurized supply pipe, a drainage elbow, eroded tile grout, or a breached slab membrane?
AC Condensate & Concealed HVAC Drain Line Leaks in Jeddah & Makkah: How to Diagnose Hidden Wall & Ceiling Moisture Without Breaking
A single air conditioning unit operating in Jeddah’s coastal humidity and Makkah’s intense summer heat generates 15 to 35 liters of condensate water per day. When a concealed UPVC drain elbow cracks inside the blockwork or bio-slime blocks the line, wall blistering and gypsum ceiling stains mimic pressurized plumbing leaks.
Underground Water Tank Level Drop & Salinity Intrusion in Jeddah & Makkah: Engineering Diagnosis & Permanent Remediation
Whether your underground tank empties rapidly forcing frequent water-tanker deliveries, or your household tap water in coastal Jeddah suddenly turns brackish and corrodes fixtures—the root cause lies in underground tank structural cracks and waterproofing failure.
Non-Destructive Water Leak Detection Methods Guide: Engineering Principles, Capabilities & Honest Technical Boundaries
Engineering transparency requires stating a vital truth: no single "magic device" detects every type of water leak at the push of a button. Accurate non-destructive diagnosis relies on combining 5 complementary physical technologies.
Hyperlocal Engineering Guide to Jeddah & Makkah Districts: How Soil Geology, Groundwater & Climate Shape Your Building’s Leak & Waterproofing Needs
A coastal villa in North Obhur faces completely different geotechnical and hydraulic forces than a duplex in Al Hamdaniyah or a mountainside building in Makkah’s Al Awali. This reference maps 42 districts across Jeddah and Makkah to their specific diagnostic and waterproofing requirements.
Frequently Asked Questions
Does installing ceramic tiles or PVC marble panels over a damp wall stop the moisture?
Not at all. Covering a wet wall with ceramic tiles or PVC panels traps water inside the masonry blockwork, forcing capillary moisture to climb higher above the cladding while generating hidden mold odor and plaster decay. The moisture source must be detected and stopped first.
How can I tell if ground-floor dampness in Jeddah is from coastal Sabkha soil or a pipe leak?
Engineers resolve this through a two-step exclusion protocol: first, we pressure-test the supply pipes, check the water meter and underground tank, and scan adjacent bathrooms thermally. If all plumbing and tanks test tight and moisture forms a uniform horizontal salt band along ground beams, capillary rising damp is confirmed and treated with negative-side salt-barrier systems.
How long does a wall take to dry after fixing a pipe leak or bathroom waterproofing before repainting?
Drying time depends on plaster thickness, block saturation, and room ventilation—typically requiring 10 to 21 days with air conditioning or dehumidification after stopping the leak. Checking moisture levels with a meter before applying putty prevents repeat blistering.
Is tile or wall demolition required to diagnose lower wall dampness and peeling paint causes in Jeddah and Makkah?
No; Bashaer Al Khair relies on a 100% non-destructive diagnostic protocol combining manometer pressure isolation, infrared thermography, digital acoustic listening, and dielectric moisture profiling to pinpoint the exact root cause prior to any repair.
When should leak detection precede waterproofing when addressing lower wall dampness and peeling paint causes?
Leak detection must always come first whenever a pressurized supply line, gravity drain, or float valve leak is suspected; applying waterproofing over an active plumbing leak traps pressurized moisture inside the slab and causes premature membrane failure.
How is the final engineering cost for inspection or waterproofing determined in Jeddah and Makkah?
Pricing is determined transparently based on property location (Jeddah or Makkah), building type, surface area and substrate condition, and the specific material system engineered in accordance with Saudi Building Code principles and manufacturer TDS.
Submit Your Issue Details to Coordinate an Inspection or Quote
Complete the fields below accurately. Your submission is validated and assigned a unique reference ID, with a ready-to-share technical summary.